
Are you looking to set up your first travel blog? You’ve come to the right place. Here, I’ll take you through exactly how to set up your blog with WordPress, walking you through all the key steps to take you from your travel blog idea to a launched website in no time at all.
Why should you read this guide?
In my day job at a digital marketing and web design agency, I work with WordPress sites all the time. Not only will I show you the steps to set up your site, I’ll also show you what I’ve learn over the last 7+ years in the industry to make sure your WordPress site is tweaked for top performance without breaking the bank. Read on to get started!
Why WordPress?
You may wonder why I’ve specified WordPress in the title of this post. Sure, there are plenty of other Content Management Systems (CMS) out there, but there are a number of advantages of using WordPress.
First, you’ll have full control over your blog. Yes, you could go with a managed platform like medium.com, however you’d have very limited control over your blog. That means you can’t run advertisements or change its look and feel, which is very limiting. With your own WordPress site, you own the site, and have full control over it.
Second, is the support for plugins. There are thousands of WordPress developers creating plugins for the platform, most of which are free to use. These plugins essentially extend the functionality of your site. That means if you think of a cool new feature, there’s a high chance that someone else will have thought of something similar and written a plugin that can accomplish this. That’s great for you, as you don’t need to learn how to code for WordPress to improve your site.
Thirdly, because there’s hundreds of thousands of coders developing for WordPress, there’s tons of support out there. If you ever get stuck, you’ll most likely find a walkthrough guide to resolve the issue with a simple Google search. And if in the unlikely event you can’t resolve it yourself, or need help building something new for your site, you’ll have almost no trouble finding a WordPress developer to help you, whether local or via an online freelancing platform like People Per Hour.
WordPress.org vs WordPress.com
There is one major, slightly confusing thing you need to know before you start, which is the difference between WordPress.org and WordPress.com.
WordPress.org is where you’ll find the free software which you can download and install on your own web server, which we’ll cover here. Doing this ensures you have all the freedom and flexibility you need to run a successful blog, and have full control over how it looks and how you monetise it.
On the other hand, WordPress.com is a managed service, taking care of the hosting for you. There is a free version, which has some limitations such as requiring your website’s domain name to look like this: websitename.wordpress.com, as well as a paid version where you can register your own domain name – without “wordpress” in the middle.
The main downside however is the WordPress.com version is very limited, meaning you won’t be able to do most of the things I’ll be walking you through below. This means if you’re happy to just write about your travels as a journal for yourself or for friends and family, that’s fine, but if you’re hoping to reach a wider audience and turn your blog into a brand, then it’s not for you, and you should read on!
Choosing a name for your blog
The first thing you should do is choose a name for your blog, which is surprisingly tough – it took me ages to come up with the name for this blog. Think about staying away from the tired old clichés found in many travel blog names, like vagabond, adventure, nomad, wanderlust or journey. These are so common and your blog just won’t stand out.
A good rule of thumb is to try and think of something short, ideally between 1 and 4 words, and not more than 5. This helps to make your blog’s name memorable.
Another way to make it easy for visitors to remember your blog’s address is to not use hyphens. It’s hard to remember whether words should have hyphens between them, and worse still if some have hyphens between and others don’t. It’s much easier to forget about hyphens all together.
You should also try to avoid pigeonholing yourself in your domain name. For example, if you wanted to focus on travel in Europe, you could include “Europe” in your domain name, but what would happen if you wanted to cover destinations in America? It’s a good idea to avoid limiting yourself like this with your domain name, however that’s not to say you can’t target only one continent or destination within your content – it just gives you more freedom in the future.
Once you’ve come up with a few names, the next step is to check if the names are available. Head over to HostGator and search for your chosen domain names. It’s also a great idea to open up Google in another tab and search for that name too. Between the two, you can see what’s available and what is already ranking in search for that name. There are a few rules of thumb to follow:
- Choose a .com domain. .com domains are the most memorable, so your readers will find your site easily
- If someone already owns the .com version of your domain, don’t bother with the .org, .biz, .co or any other variation. Because .com domains are more memorable, you’ll end up confusing your visitors, and may even send your traffic to someone else’s site!
- Similarly, don’t try using hyphens in your domain to make it different. As noted above, these are hard to remember, so again this would be confusing for readers
- A .com domain also does not specify a specific country, like many Other Top Level Domains (TLDs) do, such as .co.uk, .fr, .it, etc. This is good for a travel blog, if you’ll be writing about locations all over the world. However if you’re focussed on a specific country, say France, then a .fr TLD may be appropriate because that’s the country you’re writing about
Get hosting
Once you’ve chosen your domain name, you can register it and start setting up your site. But don’t go ahead and buy that domain immediately without reading on!
That’s because you also need to get a website hosting plan, and the vast majority of domain and hosting providers will allow you to bundle the two together, so that you get your domain included for free for the first year when you also buy hosting.
So what is hosting exactly? In a nutshell, you need a server to run your website, and the most cost effective way to do this is to rent this from a hosting company. Because your travel blog will be starting small, the good news is this won’t cost you an arm and a leg.
On top of that, we’ve partnered with hosting provider HostGator to provide readers of The Traveloid with 20% off on new hosting plans with the code SNAPPY. Just visit the link below:
Get 20% off all New HostGator Hosting plans with Coupon: SNAPPY.
If you choose to go with HostGator and use the link above, then we may receive some commission which goes into the upkeep of this site and helps us to create more content like this!
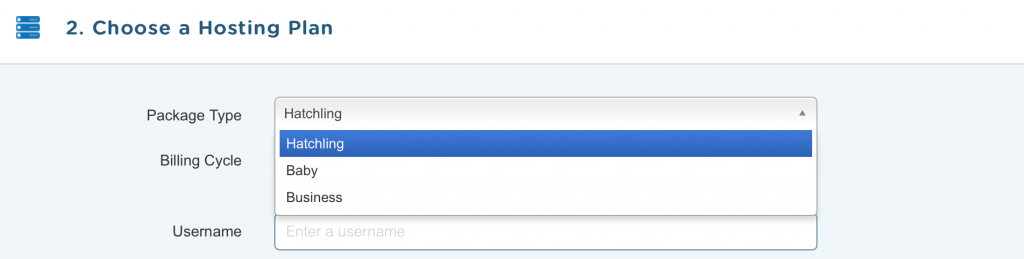
You’ll have several options here, but the only two worth considering are ‘web hosting’ and ‘WordPress hosting’. Both will work with WordPress, the difference is that WordPress hosting is specially tuned for WordPress sites, and therefore makes a faster experience for your users. On top of that, Google tends to prefer faster websites in search engine results, which can help you grow your traffic!
But if you’re looking for a cheaper entry into the world of blogging, then go for the standard web hosting, then on the next screen choose a ‘hatchling’ plan. This is ideal for new blogs with not much traffic, but if your site’s popularity explodes, then you may need faster hosting in future to keep up with the demand.
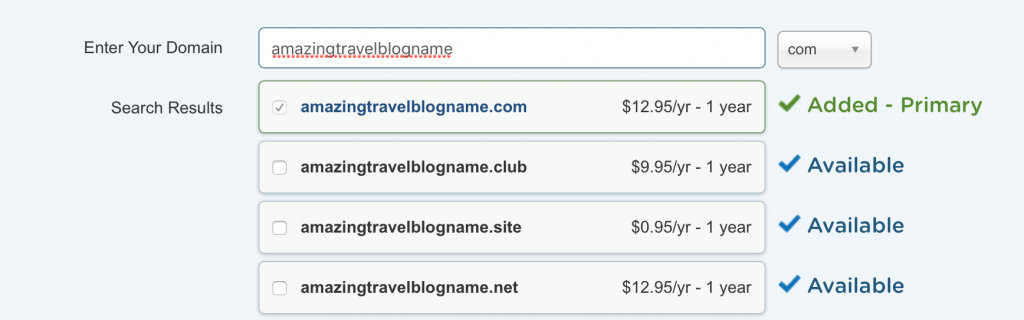
On this screen you can also choose your domain name, and it will offer you some variations that you may also want to buy. For now, there’s not much need for this, but in future as your blog grows in popularity, you may want to buy some close variants, in case someone buys a variation in the hope that they’ll capture traffic from visitors who put in the wrong address trying to reach your site.
Also, don’t be alarmed by the cost of the domain here, you’ll have the price of one domain for one year taken off the bill at the bottom of the page.
The other thing to consider is ensuring you get an SSL certificate. This is essential for using HTTPS on your site – that little green padlock that appears in your browser address bar. This is an important trust signal to users, reassuring them that their internet connection is secure from prying eyes. Google also tends to reward websites that use HTTPS with better rankings in search results!
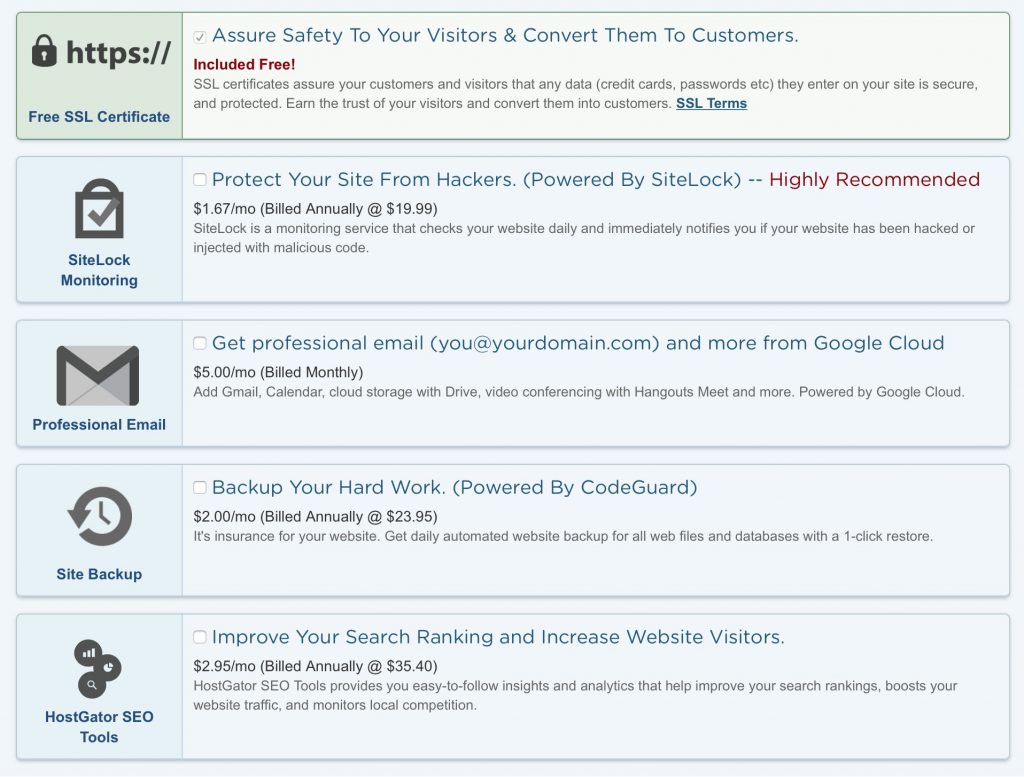
Fortunately, an SSL certificate is included with HostGator packages, but sometimes are charged separately with other hosting providers. You can safely ignore the other options here – you honestly don’t need them!
Setting up your website
With your domain and hosting purchased, it’s time to log in and set up your website. If you choose HostGator as your hosting provider, follow the steps below. Don’t worry of you choose to go with a different provider though, the steps are very similar, and they’ll most likely offer specific instructions for their platforms.
Using the quick install system in HostGator we can get WordPress set up in about 5 minutes. First, log into your HostGator web panel and click on hosting. You should then find your hosting package details, then click on manage.
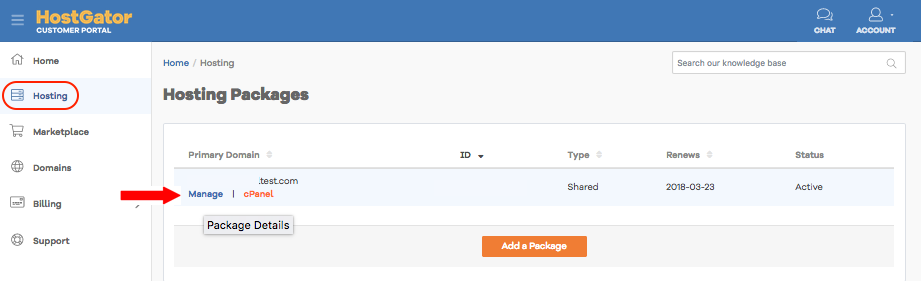
On the next screen, you’ll find a list of all the different services you can install. Click on “Install WordPress.

Next, choose your domain from the drop down and press next. Then, enter your username and login details you’d like to use to log into WordPress to manage your site. Tick the options to create a new database for the installation and agree to terms of service, and hit Install Now.
Set up should only take a few minutes. Once complete, you’ll receive instructions on how to login. On WordPress, the login URL looks like this:
Go to the address and login using the username and password you chose. You should now be in and ready to customise your blog!
Choosing a WordPress theme
So, you’ve got your site set up. The next step is to make it yours. If you visit it, you’ll see it’s using the basic WordPress theme. A theme is the design or styling for your site. Yes, you could get a web designer to build you a unique theme, but for a travel blog, it’s much easier to find a theme online. While there might be other websites online based on these themes, the chances of another blog using exactly the same theme with the same colour scheme settings and writing about exactly the same content as you is extremely slim, so it’s a great way to get your site going for minimal budget.
Head over to one of the following sites to find yourself a theme, which typically range from free to about $100:
- https://athemes.com
- https://themeforest.net/category/wordpress
- https://www.templatemonster.com/wordpress-themes.php
There are some things to consider when choosing a theme:
- Is it responsive? This means it will adapt to different screen sizes depending on the device being used. This is essential for ensuring it will look great for all users
- If a theme is image heavy, do you have photography to use that will suit it?
- Are you happy with the layouts provided? The best way to ensure your theme looks great is to keep it as similar to the demo site as possible. Most themes can be customised, but in my experience, people are often disappointed that it doesn’t look as they had hoped if they have to heavily adapt the theme
- What customisation is available? Can you edit menus, footers, sidebars and other settings? This can help you evolve your site over time as it grows
Don’t forget, you can change your theme in future, however as your site grows and becomes more complex, this isn’t as simple as clicking a button. Many themes offer unique functionality that may not transfer to other themes, so you might have to spend time rebuilding certain parts of your site.
The good news is if you want to use a free theme, you can install a few and experiment a bit before settling on one and start promoting your content.
Once installed, go to the customise screen in WordPress to complete your theme’s set up. Some themes also include other set up items, so be sure to check out the instructions for your chosen theme to ensure you know how it works and how to make the most of it.
Set up Google Analytics
The next thing you’ll want to do is set up some analytics tracking on your website. Analytics is essential for identifying what content is most popular on your site, how people find your website, and even being able to identify how people use your website.
Here, we’ll look at how to set up Google Analytics, which is a free analytics solution that’s widely used by many websites. There’s a few different ways to do this, but we’ll use one of the simplest methods so you can get up and running as soon as possible.
First of all, visit https://analytics.google.com and sign up for an account.
Next, go to Admin on the left hand menu and click on Tracking Code under Tracking Info.
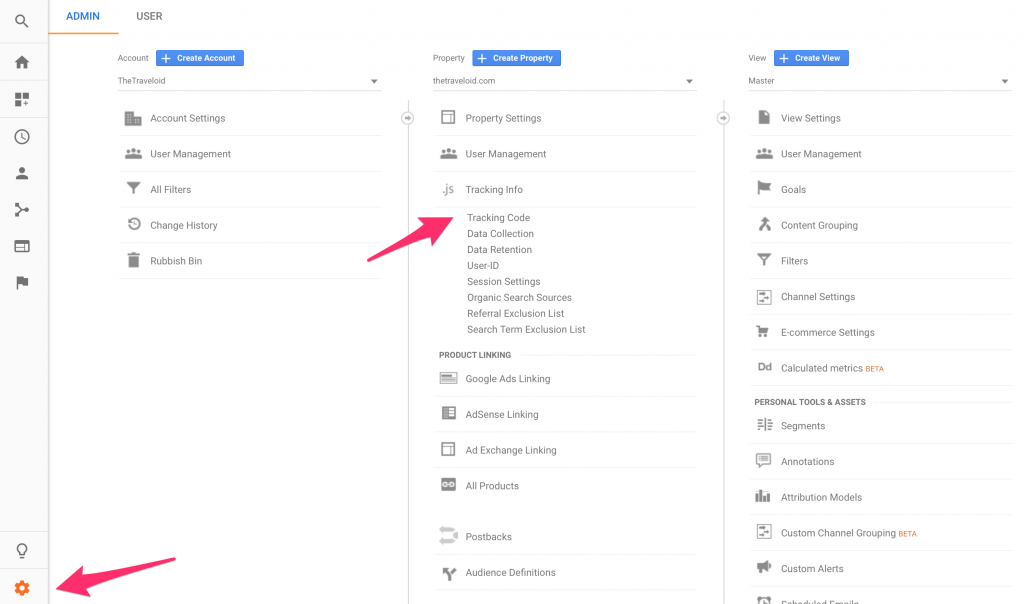
Here, you’ll find your Global Site Tag which needs to be installed on every page of your site.
In a new tab, open your site’s WordPress control panel at and go to Plugins. Click on Add New and search for Insert Headers and Footers.
Once installed, go to Settings in the left hand menu and click on Insert Headers and Footers. In the header scripts section, insert your Google Analytics tag code and hit save. You’re all set!
There’s more set up you can do with Google Analytics, but to avoid an absolutely mammoth post, this is a topic we may visit again in the future.
Set up other plugins
The Insert Headers and Footers tool you used above is an example of a plugin, which as you’ve seen, allows you to add extra functionality to your site. You may have also needed to install plugins as part of your theme to unlock extra functionality.
Plugins are what makes WordPress so great, as it allows almost infinite customisability of your site. And the best thing is that because there’s thousands of WordPress developers out there, theres loads of great plugins that will help you accomplish almost anything you need already.
Below is a selection of plugins I recommend installing for any blog:
Yoast SEO
Getting your website to appear in Google and other search engines is essential for your blog to grow. Yoast SEO is a plugin that helps you do this, by giving you the tools to edit your pages meta titles and meta descriptions – two things that search engines look at to determine whether a web page should appear in search results.
This plugin won’t make you appear in Google overnight, but being able to edit these things helps to improve your search visibility. Yoast SEO also includes a number of other useful SEO tools, so worth installing!
EWWW Image Optimiser
A fast site is extremely important for SEO and for offering a good user experience. This plugin helps to compress your images so people accessing your site don’t need to download extra kilobytes when they shouldn’t need to. This plugin works behind the scenes to compress your images so you don’t have to!
Akismet
One of the few downsides of WordPress is because it powers so many websites, it can be hit by spammers. This plugin helps to protect your site from spammy blog commenters, who attempt to get links to their spam sites onto your pages in the comments section.
Contact Form 7
Using a contact form is a great way to allow your visitors to get in touch with you. You can sue a contact form to avoid publishing your email address, which again can open you up to spammers. This plugin allows you to create various contact forms which can be placed anywhere on your site using short codes. Configure each form to send the form’s contents to your email address, so you can reply to your users without compromising your privacy.
There is also Google Analytics integration, which means you can track whenever someone submits a form through your Google Analytics dashboard.
Starbox
I use this plugin to show author details at the bottom of each blog post. Because I invite other bloggers to write for The Traveloid, this plugin helps me to give contributors a chance to promote their own blogs in return for writing for the site.
You can find and install each of these plugins by going to your WordPress dashboard, going to Plugins, and clicking on Add New at the top. Then use the search box on the right.
Cookie Consent
If you’re expecting users in Europe to access your site, you need to display your site’s cookie policy and give them details of how their personal data will be used, under the EU’s GDPR legislation. This is a useful plugin which creates a little banner for new users of your site to confirm they accept cookies and to give them a link to your privacy policy, to help you comply with these laws.
Speed up and secure your site
As we saw earlier in this guide, speed is very important for offering a great experience for your users. However, one of the problems of a travel blog is that your visitors could be visiting your site from anywhere in the world. Your website’s server is located in one place, so that can actually mean your site can be slower for people visiting it from the other side of the world.
So what if I told you there was a way to speed it up for FREE!?
Enter CloudFlare. this is a nifty piece of kit called a Content Delivery Network. It caches, or makes a copy, of parts of your website and stores it on their lightning fast servers around the world. That means when someone in Outer Mongolia tries to access your site, parts of it can be served for a server closer to them. It’s great for SEO and absolutely free for smaller sites like travel blogs, as it’s all paid for by enterprise customers – which CloudFlare hope a percentage of free customers will eventually become.
Not only that, CloudFlare acts as a security layer for your site, helping to protect you from nasty hackers and spam commenters, as well as helping to keep your site online in the unlikely event that your main hosting account went down momentarily.
First, visit cloudflare.com and sign up for a free account. Then, enter your website’s address and click the add website button. Wait for Cloudflare to scan your site’s DNS records and click continue.
Then, choose a free plan, and click next.
Open a new browser tab and go to your HostGator control panel. Click on Domains and go to Name Servers. Click change. Delete the current name sever settings and paste in the ones provided by CloudFlare in your other browser tab.
Go back to CloudFlare and hit continue. It’s then a waiting game of 24-48 hours for your DNS settings to transfer and benefit from CloudFlare. Fortunately, your site won’t experience any downtime during this process!
There are a few settings you can also turn on to improve your site further. Visit the speed tab and turn on minify on all three boxes:
This reduces the size of important files on your site, helping to speed it up further.
Now it’s over to you…
If you’ve followed me this far, well done! You’ve now got your travel blog up and running. All that remains is to write some content and publish it under the Posts section of WordPress.
In the future, I’ll be sharing some more travel blogging tips, including more guides and advice for using WordPress.
Coming soon:
We’re launching a new email group for travel bloggers wanting to improve their blogging game. Register your interest by signing up below. We’ll be in touch with new blogging advice and guidance as soon as it’s ready.
The form you have selected does not exist.